Azure provides classic IaaS (Infrastructure As A Service), allowing you to create and manage your own Virtual Machines. The Host OS and the Hypervisor are completely managed by Microsoft Azure, and you manage the virtual machine(s).
Creating a Virtual Machine
Before creating a new VM, make sure you check the price and configure an appropriate VM.
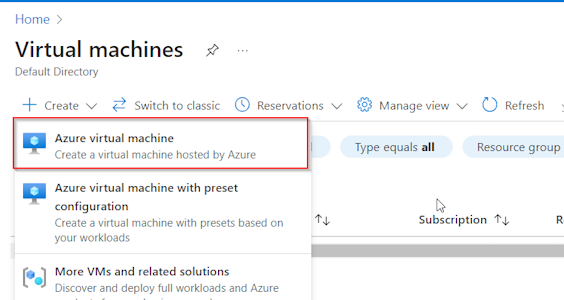
- Go to the Azure Portal, navigate to Virtual machines, click Create, and select “Azure virtual machine”
- Fill in the form, being careful toensure the machine is added to the correct Resource Group. It may be a good idea to create a new resource group specifically for your VM - it makes it much easier to safely delete the machine later.
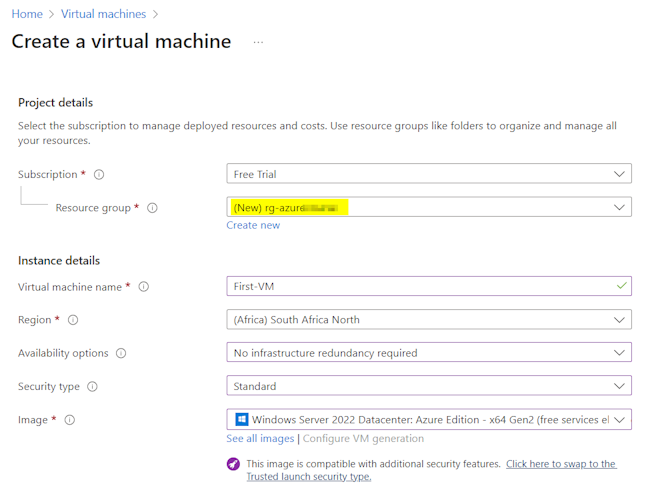
- Select the location of the VM (note that prices vary a lot by region - you may want to check pricing for regions using the pricing calculator before you do this)
- Select redundancy - start off with no redundancy requirement for basic VMs
- Select the image (OS + pre-installed software)
- Select the size (CPU, Memory, etc) - the default size is a generic all-purpose size for a basic web server
- Create the admin account for the VM
- Select ports for the machine. RDP is open by default, but note that this will allow RDP connections from any IP address - so you will need to come back and correct this if possible
- Once the basics are done, you can click through the wizard to set up disks, networks, etc, or you can review and create with the defaults to immediately deploy a new virtual machine. If you skip the setup steps, you will deploy multiple resources:
- The virtual machine
- A virtual network
- A public IP address
- A network security group, which is effectively a basic firewall that determines who can connect to the VM

- Once the resource has deployed, you can then go to the resource to see it’s status. Below you can see a running virtual machine:
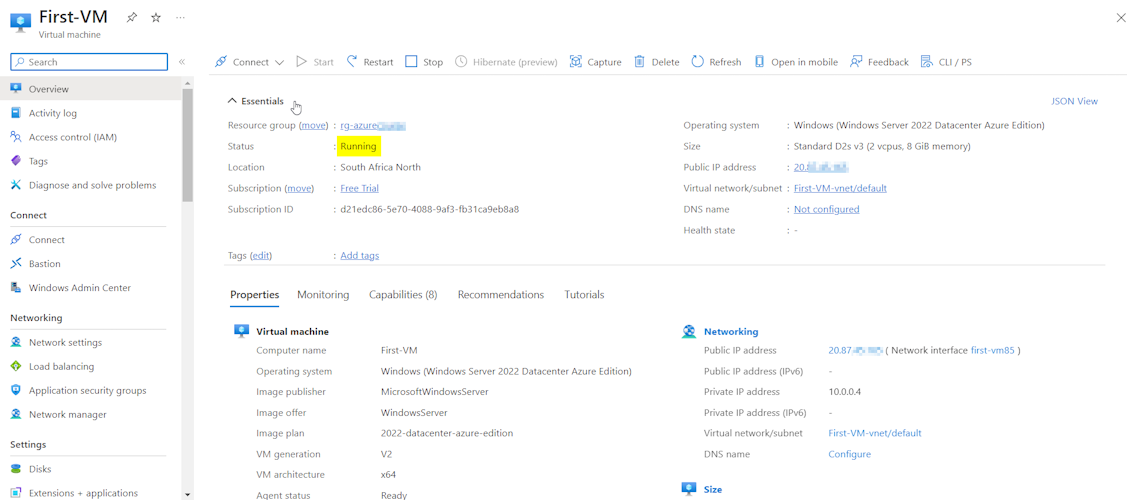
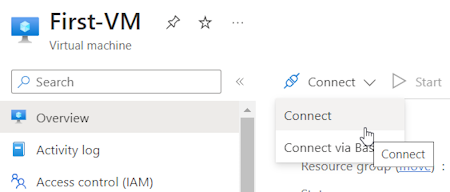
- You will also see the IP address you can use to connect to the VM using RDP. Note that if you go to the Overview page and click Connect / Connect, Azure provides a convenient download of an .rdp file. Using this file, you can now connect to a complete server available over the internet.
Pricing and Reducing Costs
The cost of a VM is made up of:
- the actual VM
- the disk used
- the IP address
- the storage
A VM created with default options will cost (at the time of writing) around $180 per month, which is slightly higher than the $156 shown in the Azure calculator.
These costs can be reduced in a number of ways:
- Turn it off when you are not using it. For machines that you only use intermittently, make sure you “Stop” them. Stopping them will also deallocate their resources, and you will not be charged until the machine is started again.
-
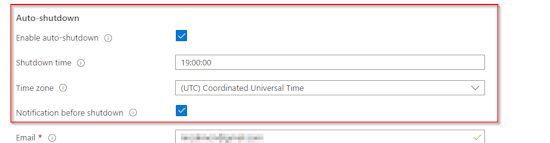
- Automatic shutdowns so the machine does not run 24/7 - only run it when you need it. This is a great option for test or development machines, and can be enabled as an option under the Management tab when configuring the VM.
- Automatic shutdowns so the machine does not run 24/7 - only run it when you need it. This is a great option for test or development machines, and can be enabled as an option under the Management tab when configuring the VM.
- Reserved instances (you commit to using the resource for 1 or 3 years). Usually done on production machines that must run 24/7. This can be divided into monthly payments and cannot be stopped or refunded, but can give savings of up to 62%.
-
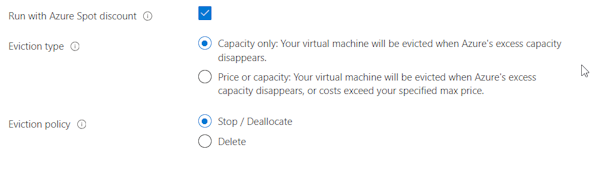
Spot instances allow you to use unused capacity in the Azure Data centres. They offer up to 90% discounts, BUT your machine can be shut down at any moment if the capacity becomes required by a full paying client. This is only really useful for non-critical background long-running calculations or batch jobs which can be interupted. This can be enabled under the Basic tab when configuring your VM.
- If you select A Stop / Deallocate eviction policy, your machine can be brought back online later to continue the work it was doing, so this is an option to consider.
- Disk optimisation - by default, premium SSD is selected for your VM. Most non-intensive machines will work fine with the cheaper Standard SSD, although note that the disk SLA does change.
- Ensure you select the right size machine. You pay for the CPU of your machine, so you do NOT want to see a CPU running idle. Ideally, you want your CPU to be running at around 70% - only upgrade once you are consistently running higher than this.
- Operating System - Linux machines are cheaper than Windows.
- Region prices fluctuate by region - if latency is not a concern, use the cheapest region for your VM.
Availability of Virtual Machines
It is important to note that there is no guarantee of 100% uptime of your VMs. Virtual machines using HDD disks, for example, only have a guaranteed 95% uptime - which is not acceptable for most production systems. Guaranteed uptime can be increased by moving to Premium SSDs and deploying instances across multiple availability zones - up to 99.99%.
There are some key concepts that need to be understood with respect to VM availability:
- Fault Domain - logical group of physical hardware that share a power source and/or network switch, where a problem with supply will affect all servers in the fault domain. You want to ensure your servers are spread across more than one fault domain.
- Update Domain - a logical group of physical hardware that can undergo maintenance or be rebooted at the same time. Maintenance is done by Azure at it’s own discretion, so if all your servers are in the same Update Domain, they may all reboot at the same time. Note that this is a logical definition, and may span multiple fault domains
- Availability Set - a collection of Fault Domains and Update Domains your VMs are spread across.
- They can contain up to 3 Fault Domains and 20 Update Domains.
- You can define availability sets to ensure that your VMs do not live on the same Fault Domain and Update Domain.
- This is a key concept for critical workloads - if you do not define Availability Sets, you may have your redundancy on a shared Fault/Udate Domain, which puts it at much higher risk of going down if Microsoft decides to reboot a host server or a fault occurs.
- When creating Availability Sets:
- Identical VMs must be deployed into the same Availability Set
- This will ensure that key VMs will not shut down simulteneously when a single Fault Domain shuts down or an Update Domain reboots
- You can use a Load Balancer to route between the VMs (e.g. for a web app)
- Availability Sets are free - but you do pay for the additional VMs
- Availability Zone - instead of using an Availability, you can use an Availability Zone for redundancy. This is effectively spreading your machines across data centers i.e. in separate buildings in the same region.
- Each zone functions as a Fault and Update Domain
- Stronger redundancy, as you are now protected if an entire Data Center goes down
- Provides a higher SLA than an Availability Set
- Just like Availability Sets, you can deploy a Load Balancer to route between VMs hosted in separate Availability Zones
- Availability Zones are free - but you do pay for the additional VMs
Deleting the Virtual Machine
When you create a virtual machine, it creates multiple resources that form the machine (see above). When you delete your machine, you will want to make sure you remove all resources related to that machine.
There are two ways to delete a virtual machine:
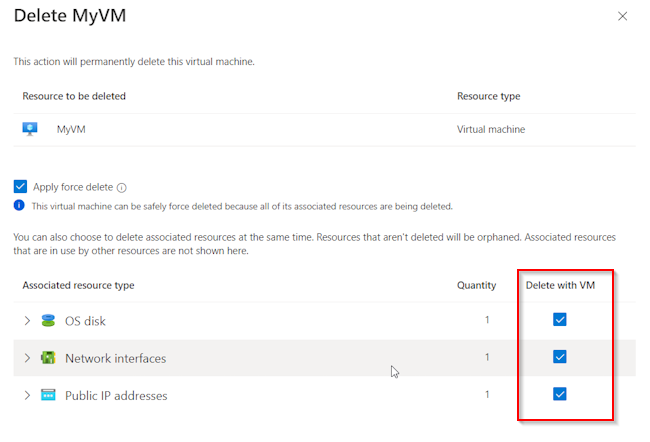
Delete the Virtual Machine
- Navigate to the virtual machine
- Click the Delete button
- Make sure you select all the resources you want to delete with the VM
- This will leave the resource group intact, which is useful if you have other resources in the same group. If not, you will be left with nothing but the network security group and the virtual network within the resource group.
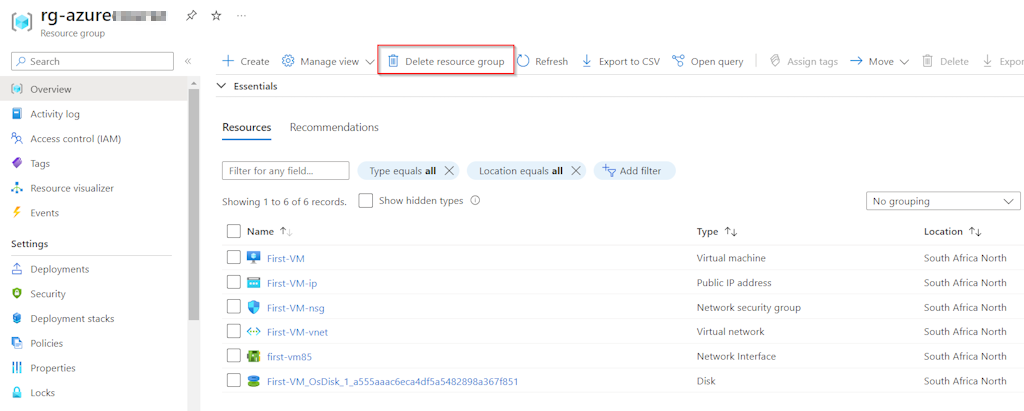
Delete the Resource Group
Delete the entire resource group that the machine belongs to - this will delete everything associated with the VM.
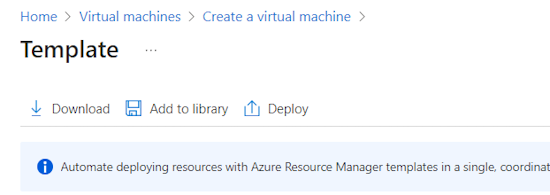
Azure Resource Manager (ARM) Templates
When you initialise an Azure VM and review your settings, there is an option to Download a template for automation.

This is an important feature - it allows you to create JSON templates for your organisation to initialise new VMs. These can be modified, uploaded, and deployed in Azure, and define a declarative way of deploying resource so you can:
- deploy multiple resources at once (e.g. a VM with it’s required network, disk, IP resources etc)
- integrate templates in CI/CD processes
- add your definitions to source control
Note that the declarative templates can be used in an imperative way, e.g. you could run an ARM template from the Azure CLI as a once-off process.
When downloading templates:
- You can edit parameters in the parameters.json file
- The admin password is, by default, empty for security reasons - you will need to manually set this
Deploying Templates
Templates can be deployed from the Templates screen:
Make sure you update the template and parameter values using your local files
This can also be done from the Cloud Shell.
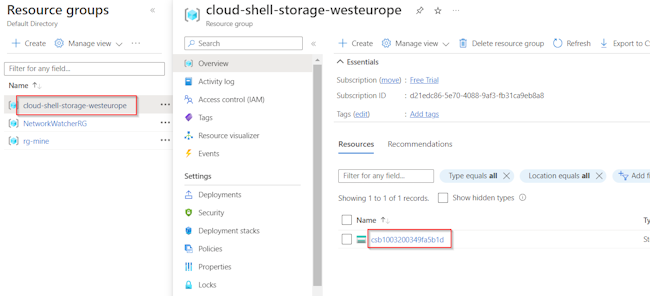
Upload your template files (template.json and parameters.json) to your Cloud Drive:
- Navigate to your cloud storage from within your resource groups
- Click File shares and go to your default file share
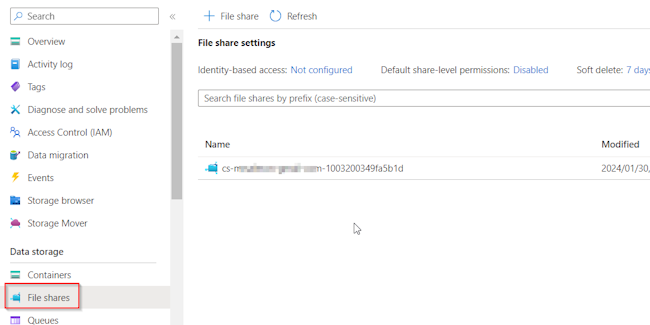
- Click Browse
- Create a “templates folder, and upload your files to the folder
- Open the Cloud Shell
- Navigate to your templates folder with
cd clouddrive,cd templates - Execute the following statement to create a new VM in the
rg-mineresource group (this resource group must exist already):az deployment group create --resource-group rg-mine --template-file template.json --parameters parameters.json
Virtual Machine Scale Sets
- Designed for scaling during times of unpredictable load
- A Scale Set is a group of VMs built from the same image which are managed as a group
- When a period of high load occurs, Azure can automaticaly deploy a new server VM (or VMs) to handle the new load. Conversely, when demand drops, servers can be automatically be dropped.
- Scale set VMs should not change once deployed - do not store files on them, or change the applications on these servers.
- Scale sets are free, but you pay for the VMs that are deployed.
Configuring Scale sets
Before you can register a scale set, make sure you have Microsoft Insights enabled:
- Navigate to your subscription in the Azure portal
- Click Resource providers
- Filter for microsoft.insights
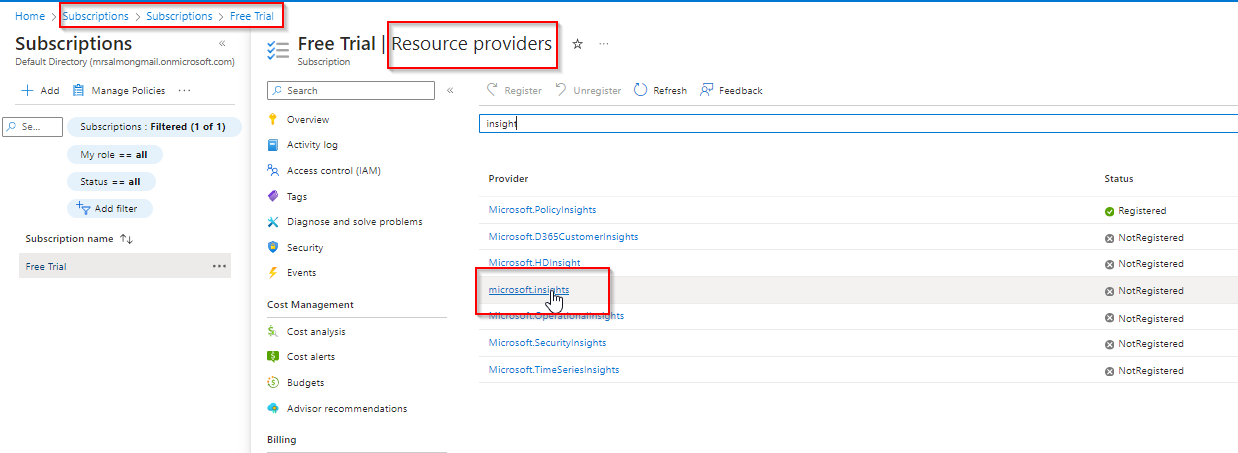
- Click the line (not the text), and click Register
- You can confirm it is registered with the following command from the Cloud Shell
az provider show --namespace microsoft.insights -o table 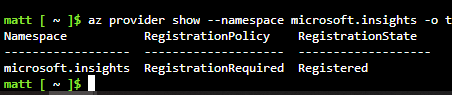
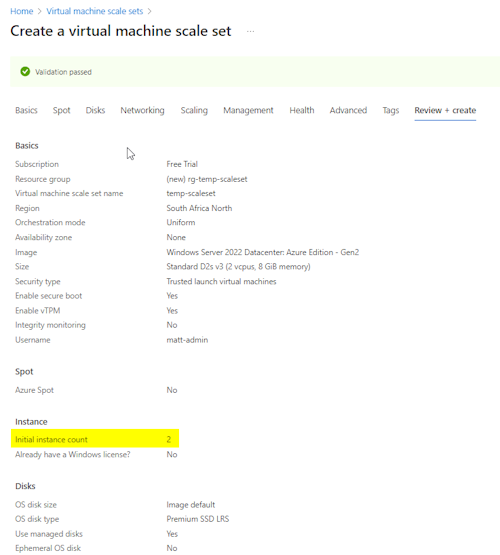
Scale sets are created in the portal under Virtual machine scale sets:
- On creation, you will see that the initial instance count is set to 2
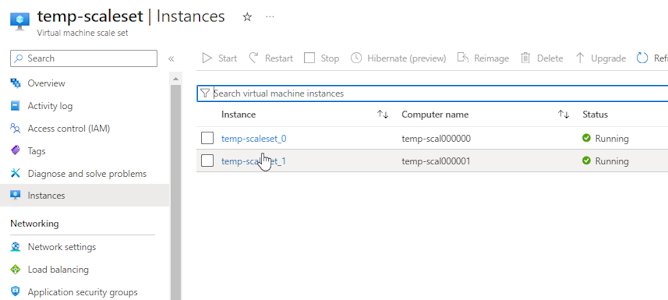
- The VM instances can be seen under the “Instances” menu option on the left
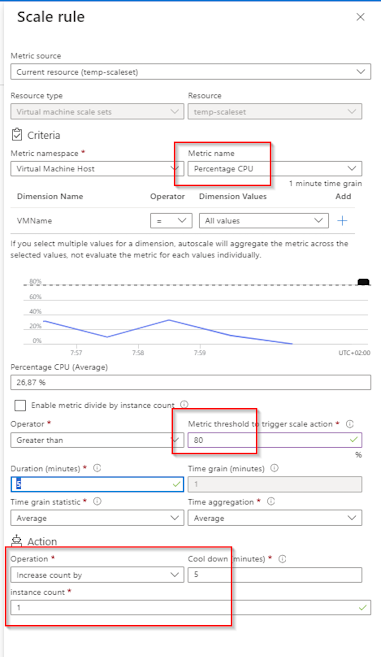
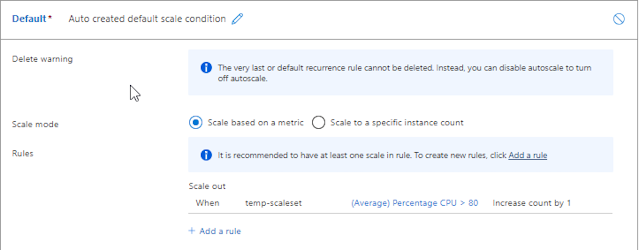
- Scaling can be customised using metrics. The following screenshot shows my temporary scale set customised so that when CPU averages more than 80% for more than 5 minutes, 1 additional virtual machine will be added to the scale set. Azure will wait for the metrics to stablise, and then add another machine in another 5 minutes if CPU is still averaging over 80%.
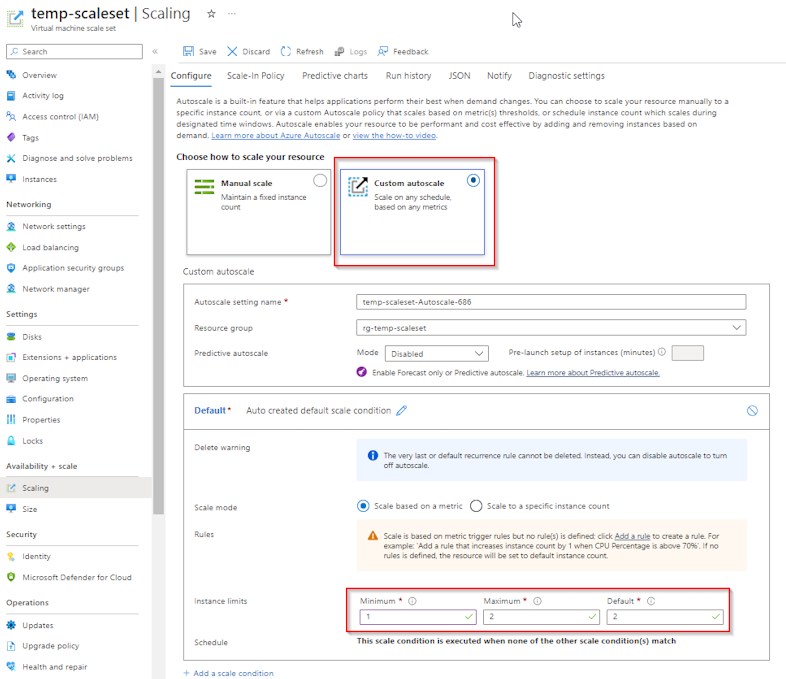
- Note that this is the scale out rule only. Per below screenshot, Azure you will prompt you to add a reciprocal scale in rule, so you can shed VMs as demand drops
Azure Instance Metadata Service
The Azure Instance Metadata Service provides a REST API accessible from Azure VMs which can be used to retrieve information about the machine (e.g. SKU, networking, scheduled events, etc.). This is particularly useful when using scale sets, as you can call this API to get notifications about upcoming evictions.
The below Powershell can be run to extract information about your local machine (note that the URL is always the same):
$headers = @{
    Metadata="true"
    Content='application/json'
}
$uri = "http://169.254.169.254/metadata/instance?api-version=2023-07-01"
$json = Invoke-RestMethod -Method Get -Uri $uri -Headers $headers
$json | ConvertTo-Json -depth 100 | Out-File "C:\Temp\file.json"
This will write the response to a JSON file, which contains useful information about your VM, where it is running, OS version, eviction policy, etc.
To get a list of events scheduled for the current VM, you can use this endpoint:
$uri = "http://169.254.169.254/metadata/scheduledevents?api-version=2020-07-01"